Etikettarkiv: guide

Running Samba in Linux in less than 5 minutes

So you want to share files over the network with perhaps windows machines or you want to be able to have networked file systems that are not requiring Kerberos to become secure but there are something fishy going on with your Samba installation?

Read on, here is the recipe to get it going. First of all make sure you have samba installed. An easy way to check this is to type the following two comnmands:

# service smbd status
 smbd start/running, process 27562
# service nmbd status
 nmbd start/running, process 27540

If either of those are not running, please install the samba package on your machine according to your OS recommendations, it may differ slightly depending on Linux distribution.

When you are done with this it’s time to modify the configuration file for Samba. Use your favorite editor (as root) and start by backing up your original configuration file.

# cp -a /etc/samba/smb.cfg /etc/samba/smb.bak

Then start your favorite editor and start off with this configuration:

[global]
 workgroup = WORKGROUP # change this to be unique on your network
 domain master = yes # there can only be one master
 local master = yes
 preferred master = yes
 os level = 65

 server string = %h server (Samba, Ubuntu)
 name resolve order = bcast host

 interfaces = 127.0.0.1 lo eth0
 bind interfaces only = yes

 log file = /var/log/samba/log.%m
 max log size = 10000
 syslog only = no
 syslog = 0

 map to guest = bad user

[guest]
 comment = networked file system
 path = /mnt/guest # set this to your preferred place
 read only = yes
 guest ok = yes

[anders]
 comment = private file system for anders
 path = /home/anders # be careful with your home folders
 read only = no
 guest ok = no
 valid users = anders

[google-drive]
 comment = private file system anders
 path = /mnt/raid/google-drive # another folder requiring password
 read only = no
 guest ok = no
 valid users = anders

[upload]
 comment = put your upload here
 path = /mnt/raid/upload # something where anyone can upload
 read only = no
 valid users = %S

Make sure the folders you have pointed out are actually valid folders. Then create the users needed to access the system:

# smbpasswd -a username

Type the password and create the users needed as per the shares that you have defined above. The valid users = %S means any user in the system can use that if they give the right password. To delete users from your samba system when no longer needed

# smbpasswd -x username

Next thing is to restard the name server for Samba and the actual server daemon:

# service nmbd restart
nmbd stop/waiting
nmbd start/running, process 28297
# service smbd restart
smbd stop/waiting
smbd start/running, process 28309

When this is done you should be able to connect giving the right username/password or as a guest if you have created the shares for the guest accounts.

Mounting the smb file system on a command line is done like this:

# mount -t cifs //server.name.or.ip/share /mnt/share -o username=yourname

If needed it will ask for your password also.

To list shares on an SMB server, use the following:

# smbclient -L //server.name.or.ip/ -U user%pass

You can skip -U user%pass if you prefer working as guest.

This should get you up and running easily. It’s not sophisticated and you have to manually work the passwords and they are not synced with with the rest of the users on the local machine, that is more complex to set up, this was meant to be a quick starter to get you going.

If you need to list the users in the database (to remove any you do not want any more) you can use the command:

# pdbedit -L

Read the man page for more information.

Art in the Subway

Here in Stockholm there are many interesting pieces of art in the underground metro lines. This autumn SL, the authority running the three metro lines here in Stockholm arranges a series of train rides with a guide to guide you through the art pieces.

This will happen roughly twice a week starting this thursday (day after tomorrow) but unfortunately I am busy thursday nights. The second night is on the coming Sunday however when I think it would be a great time to meet up and bring the cameras along.

Anyone interested in joining in on a project and learn more about the beautiful metro in Stocholm and perhaps get the chance to photograph the arts in the subway?

Here is a link to the programme unfortunately all in Swedish but the dates are there.

A Guide to Infrared Photography

This article will start by assuming that you are very familiar with your camera and how to use it in manual mode. You need to understand apertures, shutter times, how to use the cameras histogram to understand over- and under exposure.

If you are not familiar with these topics, then it would be better if you familiarized yourself with them before. There are a number of articles you can find that will take you through this of course.

What is infrared light?

Infrared light is light that has a frequency that is lower than the visible light in the spectrum. We can also say that the wavelength is longer than the visible light. Infrared light have various properties that are different from visible light and it reflects and refracts different from visible light through the camera lens.

Here is a diagram that shows how the infrared spectrum relates to the visible light spectrum. In this article we will only be talking about photographing in the infrared spectrum that is close to visible light, between 1200-730 nm roughly. Infrared photography in this aspect is not to be confused with heat signature cameras and systems such as FLIR (example below) which are used for example to detect body heat. There is also the ”far infrared spectrum” said to have medicinal use and influence for example the production of vitamin D in the skin of humans and a few other species.

Radation in the thermal heat range and the far IR range does not really affect the result of IR photography as we have limited our reception range to the near visible light IR spectrum. The sensors in a digital camera is also not very sensitive in ranges under 1000 nm so it makes little sense trying.

This shows the spectrum of electromagnetic radiation. Source: Wikipedia Commons.

Looking at the picture above we can see that the visible light spectrum ranges from around 730 nm to about 370 nm. Above we have X-ray and gamma rays, nasty stuff to us humans but below is the infrared portion of the band.

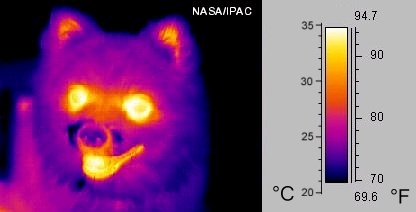
Thermal Image of a Dog. Source: Wikipedia Commons.

Here to the left is a picture taken with a different technology (FLIR) that captures the heat radiated from a body.

We can here see the lighter areas correspond to hotter parts of the animal. This is a technique that is quite often used for tecnhical purposes such as trying to find leaks in insulations and heat pipes and similar.

This is known as thermal imaging but is the area around 100 µm and photographic sensors for normal cameras don’t work well in this range. This is however what most people think about first when subjected to the term ”infrared photography” and it is important to distinguish between the two.

So the infrared spectrum we are interested in lies between the lowest portion of the visible light spectrum around 730 nm and down to perhaps something like 1200 nm. This light comes normally from very ”hot” sources, such as the sun, or a light bulb perhaps.

Those of you who are physiscists may remember the black body radiation formula and put it to use here :)

Black and White
In this picture it is possible to see the difference between the visible light spectrum and the IR spectrum. The left hand picture is shot with infrared filter and the right hand side is a normal visible light picture that has been shot in B&W

Fortsätt läsa A Guide to Infrared Photography