A Guide to Infrared Photography

This article will start by assuming that you are very familiar with your camera and how to use it in manual mode. You need to understand apertures, shutter times, how to use the cameras histogram to understand over- and under exposure.

If you are not familiar with these topics, then it would be better if you familiarized yourself with them before. There are a number of articles you can find that will take you through this of course.

What is infrared light?

Infrared light is light that has a frequency that is lower than the visible light in the spectrum. We can also say that the wavelength is longer than the visible light. Infrared light have various properties that are different from visible light and it reflects and refracts different from visible light through the camera lens.

Here is a diagram that shows how the infrared spectrum relates to the visible light spectrum. In this article we will only be talking about photographing in the infrared spectrum that is close to visible light, between 1200-730 nm roughly. Infrared photography in this aspect is not to be confused with heat signature cameras and systems such as FLIR (example below) which are used for example to detect body heat. There is also the ”far infrared spectrum” said to have medicinal use and influence for example the production of vitamin D in the skin of humans and a few other species.

Radation in the thermal heat range and the far IR range does not really affect the result of IR photography as we have limited our reception range to the near visible light IR spectrum. The sensors in a digital camera is also not very sensitive in ranges under 1000 nm so it makes little sense trying.

This shows the spectrum of electromagnetic radiation. Source: Wikipedia Commons.

Looking at the picture above we can see that the visible light spectrum ranges from around 730 nm to about 370 nm. Above we have X-ray and gamma rays, nasty stuff to us humans but below is the infrared portion of the band.
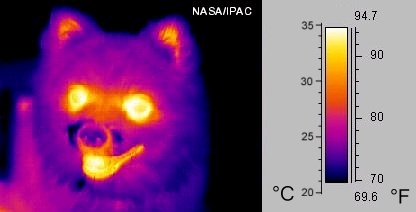
Thermal Image of a Dog. Source: Wikipedia Commons.

Here to the left is a picture taken with a different technology (FLIR) that captures the heat radiated from a body.

We can here see the lighter areas correspond to hotter parts of the animal. This is a technique that is quite often used for tecnhical purposes such as trying to find leaks in insulations and heat pipes and similar.

This is known as thermal imaging but is the area around 100 µm and photographic sensors for normal cameras don’t work well in this range. This is however what most people think about first when subjected to the term ”infrared photography” and it is important to distinguish between the two.

So the infrared spectrum we are interested in lies between the lowest portion of the visible light spectrum around 730 nm and down to perhaps something like 1200 nm. This light comes normally from very ”hot” sources, such as the sun, or a light bulb perhaps.

Those of you who are physiscists may remember the black body radiation formula and put it to use here :)

Black and White
In this picture it is possible to see the difference between the visible light spectrum and the IR spectrum. The left hand picture is shot with infrared filter and the right hand side is a normal visible light picture that has been shot in B&W

Fortsätt läsa A Guide to Infrared Photography

Scott Kelby’s Worldwide Photowalk: Stockholm

So yesterday 50 people were enlisted for the photo-walk, I think more than 40 turned up at Högalidskyrkan and we started walking. It was a beautiful day, we had exeptional luck with the weather and it turned out to be a very nice event.

Lots of pictures was taken and due to an unfortunate accident I lost some good pictures on a memory card that decided to fail of course. But since I regularly swap cards in the camera this did not affect too many pictures and most of the really good ones I liked was saved!

Check out mine and the other people’s photos in this Flickr group!

Stockholm and Reflections
Stockholm from the South lake Mälaren coast line
Walking Path Infrared
Path in Infrared
Details
Details of Church Wall
The Window and Reflection
Window and Reflection
Högalid Infrared
The Högalid Church in Infrared
The Bench
A Resting Place
A Dead Bike
The Dead Bike

PMR Radio in Europe

Cobra Walkie-Talkie
Cobra PMR446 Walkie-Talkie handheld radio

In a variety of activities, including photography when you are not doing it alone, it makes sense to have good communications. We are pretty lucky here in Europe that there is a part of the frequency spectrum open to unlicenced use for anyone who can afford a €20 set of ”walkie-talkies” can access this. This means anyone can use these radios without any licencing or fees and it sure beats mobile phones when it comes to the cost of the calls.

Frequency table

The channel spacing is 12.5 kHz just like some other older PMR (Personal Mobile Radio) systems earlier. The modulation type is FM (F3J) and with the low power they have pretty good battery times as well, I can carry one unit for a full day without needing to recharge it.

Frequency Channel # Usage
446.00625 1
446.01875 2
446.03125 3
446.04375 4
446.05625 5
446.06875 6 Geocaching and Geohashing is using this frequency
446.08125 7
446.09375 8

Power Limits

The output power is limited to 500 mW ERP (Effective Radiated Power) and the antenna is only allowed to be the fixed built-in antenna that was tested with the device for compliance. This output power gives you a coverage radius of a few hundred meters in a cityscape and a few kilometers in a flat country side.

Several manufacturers are printing ”5 km coverage” and similar numbers on their boxes. You can also see the same manufacturer claiming 5 km, 6 km and even 8 km coverage on similar devices and although they charge much more for the 8 km version there is very little proof that it is actually better than the 5 km verstion. The reason for this is that the output power is fixed to be a maximum of 500 mW radiated.

The most variance you will find is on the receivers and not the transmitters really so there may be some differences depending on how sensitive the receiver is in your particular unit.

Squelch Coding

Many of these radios also employs a kind of squelch system called CTCSS (Continuous Tone-Coded Squelch System) which is used when several users are using the same frequency. If you set your radio to the ”sub channel 5” using the CTCSS system then you will not hear people as they talk unless they transmit this code. The code is automatically transmitted when the push-to-talk button is engaged. This avoids random conversation disturbing you.

It does still not allow people to talk simultaneously on the same frequency and it is not a privacy function since any radio can turn off the feature and then hear all conversations that are carried on the frequency. Most radios can also be set to scan the whole frequency band and therefore find any ongoing conversation quite easily.

My Fear of Street Photography

Looking forward to the photo walk here in stockholm, to meet up with other photographers is always fund and I hope I will be able to get some good shots as well but I really suck when it comes to street photography. I have such a hard time composing that I miss the moments that I want to capture and I need to practice this. So I have considered ”going light” this time with the stuff that I need mainly in my pockets and of course a tripod, camera and one lens.

Instead of focusing on using the proper prime lens for the job I will be lugging my 18-200mm lens that can do almost any kind of shot. Although this lens is a bit on the soft side and I prefer a harder sharpness in my photos it is still a really nice all-round lens that can do many situations instantly. It is also equipped with the VR function to reduce shakiness when hand-held and that should be a great help today.

Here are some street shots that I have done earlier which are not half-bad but I don’t feel confident I can actually ”make” the photos the way I really want them. So this will be a very interesting test for me.

DSC_1792
"Rain and reflection" - Kingston Upon Hull, Yorkshire, United Kingdom

Dark and Light
"Black Side - White Side", Kingston upon Hull, Yorkshire, United Kingdom

South end of Stockholm
"Nightfall over Stockholm" - Shot from the roof of the highest building in Stockholm, the old tax office.

The Light Comes In
"The Light Comes In" - There is a crack in everything, that's how the light comes in, Leonard Cohen. Shot in Gamla Stanm, Stockholm

The walk starts at hornstull at Högalidskyrkan (the church) and then we are off in smaller groups. The walk ends at Mosebacke. I will of course post pictures as they are developed after the walk. The weather looks nice still and I hope we get a really nice evening in town!

I am also considering trying out IR photography in this setting. It could be difficult of course but I think it could be interesting. But this means I have to lugh around my tripod – something that has never been a problem before but it is of course time consuming to set it up to shoot when everyone else snaps a picture and moves on but I think that it would be cool.

So this is my plan equipment-wise:

  • Camera D70s
  • Lens: Zoom-Nikkor AF-S VR 18-200 f/3.5-5.6G ED-IF
  • Micro-fibre lens cloth of course
  • Circular polarizer Ø72mm
  • IR filter Ø72mm
  • Extra battery camera
  • Memory cards
  • Tripod with shoulder sling bag
  • Towel to protect camera if there is rain

GooSync

GooSync Home Page.

This is a really good synchronisation program that I use to sync my Google Calendars with my mobile phone. I am using a HTC Touch Dual phone right now, Windows Mobile 6 based device and it doubles as my PDA and emergency surf tool.

This synchronisation works with most modern phones and you can log on and check if your model is supported. Configuration is simple and works great so finally I can use google calendar seriously.

Never miss that photo event again! Sync, sync, sync!

The Difference Between DX and FX Lenses

Sometimes people ask questions on what the difference is between DX and FX lenses. DX and FX are Nikon lingo in specifying different sensor sizes on cameras.

On digital cameras Nikon have traditionally employed what they call DX size sensors. This sensor was originally a CCD type sensor such as the one in the D70 camera and has later been replaced by a CMOS sensor on the later versions such as D200 and later cameras.

Before we all went digital a ”normal” prosumer or semi-pro camera was almost always a 135 system camera. This means we had 35 mm film in the camera and the projected image was usually 24×36 mm onto this film. With the invention of the APS-C format sensor which is 23.7 x 15.5 mm in size this format was known as DX. They are all small format cameras.

Because the digital bodies, with the exception of the so called ”full frame” bodies, have a much smaller area onto where to project the image from the lens, it is possible to make cheaper and lighter lenses by sacrificing the area outside the sensor. The result is a special line of lenses called ”DX” lenses.

Canon, Sigma, Tamron, Tokina… they all have their own respective way of denoting lenses that are ”optimized” for digital DX format cameras. But what happens if you mount a DX lens on to an FX body and start taking pictures?

In the worst case you would get completely black corners. Because the ”full frame” sensors are bigger parts of them may fall completely outside the projected image by the sensor, something that would lead to black corners.

In many cases it would not be so dramatic but instead you would see some vignetting, the falloff in light in the corners and in all cases you can be pretty certain that sharpness, chromatic aberration and so on will not be very good in the corners of the picture.

Here is a demonstration of the difference and why it may be difficult to use DX lenses onto the new types of digital cameras with larger sensors, results will vary depending on the actual lens, some DX lenses work better but never as well as a lens actually designed for FX format cameras.

Vignetting
This picture shows an extreme case of vignetting where the image from the lens fails to cover the whole sensor of the camera. This can happen for example with extre wide-angle lenses designed for DX cameras and mounted onto FX bodies.
Vignetting
This is a more normal result of what most DX lenses would produce on FX bodied cameras, the falloff is more graduated and could still be useful.
Vignetting
Here is the lens used on a DX format camera. Note how the crop factor of the camera "crops away" all the vignetting of the lens.

By not having to design lenses for the full FX format the manufacturers can make do with smaller lenses, this means they can be lighter (good for hiking photography) and they can be made cheaper.

How about using FX lenses onto DX cameras then?

That works exceptionally well! Because of the crop factor the DX body will use only the best part of the lens, usually the middle of the picture is sharper and more defined than the edges and if the edges are cropped away because of the smaller sensor you will have excellent sharpness all the way out in the corners of the picture!

So there are definitely advantages to the DX type bodies, that should not be forgotten!

Photo Viewer from Microsoft Labs

University of Washington and Microsoft are working together to create a new way to browse photos. This is different from the Photosynth [microsoft labs] technology in that angles and positions are being analyzed and so pictures can be related to each other.

By doing this it is possible to ”zoom” in infinitely through the world, visiting famous places or just someones living room. Check out this demonstration video.

However, I have serious doubts that this technology will work well in the real world or become a useful product. It is one thing if you have geotagged photographs (that also contains information on bearing and azimuth) but it is a completely different thing on just analyzing the content of the photographs. For example a Volvo S40 car would look just the same in Brazil as it would in Jordan and there are some temples in Greece that are built as replicas of others, to accurately depict them would mean a lot of manual labour unless we can take a new step in geotagging of course.