Etikettarkiv: Technical

DOF

The DOF
Taken in Saltsjöbaden, Stockholm, Sweden using Nikon D70s and Nikkor AF 50/1.8D. Post processed in Adobe Lightroom.

One of the greatest things with a SLR type camera is that it is possible to control the focus in the picture. This area is known as the DOF or the Depth-of-Field, or the Depth of Focus. This the space in a picture where things are in focus. In front of the DOF is the near out of focus field and beyond is the far out of focus field. There are certain things that controls this field and this article will describe them and how you can use them to improve your pictures. Without going into the actual optics, I will try to explain how to achieve the desired DOF and what it can be used for.

What affects DOF?

The DOF is actually the part of an image that is in focus. Any lens have a certain volume where things are percieved to be in focus and this volume or field of focus is referred to as the DOF. There are several factors that influences this, one of the most important factors is the aperture setting of the camera.

The aperture

The aperture controls how much light that falls into the camera at a given moment, it is a diaphragm in most cameras it is located inside the lens or just behind it, in the SLR type cameras it is located in the detacheable lens that is part of a camera system.

The aperture can generally be set in several steps. Earlier lenses permitted a limited number of steps but modern lenses and digital cameras permits the aperture almost always to be set in steps of 1/3 of a EV. The aperture is expressed as a ratio between the focal length and the diameter of the diaphragm and therefore it is written as f / 5.6 for example.

Cheaper lenses have a more narrow range of apertures than more expensive lenses, this means you can ”open up” the aperture more on the expensive end, this is sometimes called ”fast” lens (because they give shorter shutter times for the same scene during same conditions as a less expensive lens does) or more ”sensitive”.

If you are using a good lens and you are setting it to the  lowest f-stop permitted then you will have the most narrow DOF that this lens can produce. This is a start and a setting you might want to use during low light conditions but remember that your shallow DOF can make it difficult to get the full scene in sharp focus.

The focal length

The focal length plays together with the aperture of course as we have already talked about. The focal length is what you ”zoom” to when you zoom, or the fixed focal lenght of your prime lens. The smaller the focal length, the wider the field of view and the deeper the DOF becomes.

The greater the focal length, the more you ”zoom in” the shallower the DOF becomes.

The focus point

The focus point is the last part of our equation. The closer to you the focus point lies the shallower the DOF is. The further away you focus the deeper the DOF will become.

It is all about rations between these three, the aperture, the focal length and the distance of the focus point. If you want to create a shallow DOF you should open the aperture, zoom is as much as possible, go close as much as possible and then focus closely.

Remember also that most of your DOF is behind the point of focus, when you focus on somethin the DOF arranges so that you have 1/3 of the range in front of your focal point and 2/3 behind it. Make use of this!

Portraits

This is used in portrait photography to create a sense of depth in the image. Typically you see the model in sharp focus and the background cast in blurriness, this is due to using the DOF properly.

Portrait optics are usually in the range of 90-135 mm focal range and can often be used with an aperture up to f / 2,8 which allows the photographer good control over the DOF and to photograph in the low light of dawn and sunset.

Hyperfocal charts

Finally

These are the things that affects your DOF:

  • Focal length
  • Aperture setting f / x
  • Distance to focus point

When you focus on something the DOF extends 2/3 beyond that point and 1/3 in front of it.

Lead accumulator charge table

[table=8]

Table is given for 20°C.
Adjust table with 0.022V/°C when deviating from this temperature.

Unloading-end: 11.8V, charge with 13.2-14.4V. Battery will start gassing at 14.4V (do not exceed). Continuus preservation charge max 13.2V. Float charge; 13.4V for gelled electrolyte, 13.5V for AGM (Absorbed Glass Mat) and 13.8V for flooded cells.

Precision of charge voltage is critical to keep sulfatisation at a minimum. An error of 5% may be enough to reduce life substantially.

A newly charged battery will quickly drop to 13.2V and then slowly settle at 12.6V. After full charge let battery rest 20 hours before measuring open circuit voltage. There might be residual surface charges on the conductor plates otherwise.

Equalization charge – maximum 2 hours at 15V. Make sure ventilation is good and battery temperature is constanly monitored.

LaTeX page re-opened

Finally here is my old LaTeX page re-opened for everyone who is involved in writing technical documentation. I hope that you will have lots of good use for this. I still see people linking to this page so therefore I am hoping that the re-opening should be something that benefits everyone.

On this page are lots of various collected nice to know things as well as a swedish style sheet and two templates, one for technical documentation and one for writing a business-like commercial letter.

Tills sist så har min sida åter öppnats om typsättningsspråket LaTeX där det finns en massa tips och tricks för den som fortfarande ägnar sig åt detta. Jag ser fortfarande dagligen folk som länkar till den gamla sidan så genom att ge den nya samma URL hoppas jag att ni hittar tillbaka igen.

På denna sida finns en massa olika saker som jag samlat på mig genom åren och det inkluderar också ett svenst stylesheet för typsättning av svenska dokument, en mall för teknisk dokumentation samt en mall för att skriva brev.

Learning from the masters

Bia and Bosse the SnakeA little while ago I found this excellent blog on Nikonians by Martin Turner. He writes about how the classic potratit painters worked and how we can improved our portrait photography by learning from these masters. He has written several very interesting blog posts on this subjects and I felt like commenting on them myself.

BellaIn his first post also titled ”Learning about portraits from the masters” he discusses the context of the portrait more than the actual technique to pain or photograph. A portrait is supposed to say something about the person being portrayed and therefore it is important to not lose context and pay some attention to the surroundings of the person, the positioning of the subject, any other props or objects in the picture should have meaning and add to the portrait and not detract from the person being potrayed. I think this is an important lesson and something that is easily forgotten.

DanielIn his second post he speaks about differential focus something that has been used by painters for a long time and photographers using a telephoto lens, wide open aperture and focusing as close as possible to re-create. Of course post processing can also be used to achive this and there are more than one way of doing nice differential focussing on a subject.

For a portrait we want the eyes to be sharp, then the mouth and the hair are also important — putting too much fuzziness on the hair makes things look strange and the eyes and mouth are what we as humans focus mostly on when we are viewing a portrait of someone else. An excellent example about this is the painting of a Genoese nobleman painted by Bernardo Strozzi in oil on canvas.

DSC_7002 The EyeAnother thing that he notices are also that backgrounds in paintins are almost always very dark. Almost to the point of being black but never completely black there is always some texture to them but in a very subtle way and the idea of isolating the person from the background is very evident.

Today in photography we often use light backgrounds, even white overexposed so called high key shots which usually means you put 4 times as much light on the background as you do on the subject. Makes it easy to cut out in photoshop and re-arrange in a different background but I get a feeling there is a reason that portrait painters never used such backgrounds.

DSC_1334He also talkes a lot about skin details and softening of the skin in portrait. This was done by painters also using selective focussing techniques when painting but this is also likely down to that our minds generally don’t remember much skin details, we focus on the areas around the eyes and mouth and we tent not to remember too much on other details.

The rest of the posts are also interesting but his number 2 post was the best one so far in my opinion.

You can find Martin Turners Nikonian blog here if you want to read more, and I hope you will because it is very interesting to read his articles!

Suunto Core Outdoor Watch

Some of you already know my fascination for wrist watches and therefore I thought I should share with you my latest aquisition, the Suunto Core outdoor wristwatch. Suunto is Finnish and means direction and this is a good name for these watches. There are many different models to chose from and I decided to get the Suunto Core model which seems to get you lots of functions for small money and the most all-round watch there was. Or, sorry, wristtop computer as these watches are sometimes referred to.

I am a guy who like walking in the woods, hiking, trekking and just generally being outdoor when possible especially in the summer time. I try to make at least a few day trips and if possible an overnight in a tent as well every summer as a minimum, it is something special when you are cooking in the wilderness, sleeping in a tent and generally having to struggle a little more than you normally do every day to and from work. If nothing else you appreciate a nice bed when you come home again :)

On top of that I am an unchangeable gadget-guy, and I really enjoy knowing the altitude I am on right now, the bearing I am walking in, my position, the time, when the sun rises and sets on the latitude that I am right now and many other things. So my latest addition to things I won’t leave home without now is a Suunto Core wristwatch.

This little gem can do a lot of things and it is a watch specially designed for outdoorsmanship more than anything else. This is not the first ”trekker’s watch” I have owned, I also have an ”Origo” watch but after a particularly rough outing in the United Arab Emirates a couple of years ago the altimeter broke on that one. So I have decided to get myself a new watch and now I recently bought it.

The Suunto Core watch keeps two times, good for traveling and it has what you expect from a modern digital watch, countdown (99 min max) and works wel as a stopwatch (24 h max). On top of that you can program it with the closest city and it will show the time the sun rises and sets for the date, something that changes drastically right now, the day becomes longer with about 6 minutes every day now and the nights shorter here in Stockholm.

The watch also contains three interesting functions for the hiker not normally found on wrist watches and they are altimeter that shows how high over the sea you are at the moment, barometer showing the air pressure (sea level equivalent) and an electronic compass.

Suunto Core
Suunto Core, outdoors sportswatch

The altimeter and barometer are actually two faces of the same coin here. You can select the profile yourself, if you want the watch to be in altimeter mode when you climb, then you can set it to barometric mode when you stop for the night and the watch will tell you the air pressure and assume that you are staying on the same level. You can not get both at the same time though because both the barometer and the altimeter works from the same air pressure sensor. If you climb a mountain the air pressure lowers with every meter you climb, the watch senses this change in air pressure and can therefore know how many meters you have scaled. In barometric mode you fix the altitude and the watch instead registers the changes in air pressure that preceeds an oncoming storm or weather front.

The watch can automatically shift between altimeter and barometer mode, it understands when you start climbing because the air pressure shifts too fast and then it switches to altimeter. If you stay it will after 12 minutes of no change in the altitude (or very small changes) shift back to barometric mode. Brilliant. Over a full days walking around I generally don’t have to recalibrate it for more than 20-40 meters error by the end of the day.

In barometric mode it can also tell you if there is a sudden drop in air pressure. This might signify an oncoming sqall or storm and you can set an audible and visible alarm on the watch to go off if this happens. There is also a 24 hour trend graph that will show you the changes in barometric pressure over the last day and night. There is also an arrow indicator showing you if the air pressure is stable, tends to rise, tends to drop and the attitude for the last 3 and 6 hours. Great for checking if the current weather is stable. I have observed the barometric pressure alarm go off twice. In both accounts it started snowing heavily hours later so I believe it is working pretty well!

The last function of the pressure gauge is the ”snorkeling feature” where it can tell you when you snorcle in the hot waters of the Maldives or some other nice place how deep you have been as maximum and how deep you are now. Not quite a diving instrument (watch should not be submerged more than 10 meters really) but it is still a pretty fun feature.

A logging function can be used to keep track of your climbing and descending over time if you want. It will log the altitude and the current time as often as you want and you may also save the log for a later review. You can also set a reference altitude and the watch will show you how much above or below your reference you currenly are.

You can also have it show accumulated inclines declines, something that I thought was pretty neat in a ski slope…

There is also a temperature measurement but since the watch is warmed by your arm it generally does not show air temperature. If you take your watch of and leave it for 30 minutes or so it should give you a pretty good temperature reading though. The temperature is also necessary for the accuracy of the air pressure measurement.

The compass is great, works well but uses battery more than other thngs and because of this the watch will turn it off after one minute of operation; you will then have to press a button to turn it on again for another minute. If you have the backlight lit during compas operation it will flash as it goes dark for each measurement that is done – about 2 per second. The compass can be set to try to stay in a certain direction, it will show with arrows how much in error your current direction is and point you in the right direction and the precision is actually pretty good in the woods. Calibration is simple, turn it on, slowly spin a full circle clockwise and it will recalibrate itself. In urban environment there are sometimes problems where there are heavy electrical machinery and other ferro-magnetic materials at work that will confuse it – try looking at it while a metro train in the underground drives past… but most of the time it can be used there as well.

All in all I really love this watch. I recommend it for everyone who loves to be outdoors, hiking, fishing, hunting, climbing, skiing… this is for you!

I rate it 5/5.

Frequency Allocation in the Swedish 2.6 GHz band

This is the current allocation of the Swedish 2.6 GHz band after the frequency auction among the operators for the emerging 3G+ services such as WiMax and LTE to be used in Sweden. More bands are likely to follow.

[TABLE=2]

Duplex distance for FDD bands are 120 MHz. Uplink covers UARFCN 12500-12850 and downlink is 13100-13450 and the TDD band is 12850-13100.

The 50 MHz TDD band in the middle between UL/DL portions of the FDD band is thought to be used for Wimax in the future. Intel Capital Corporation will probably work together with some operator to provide WiMax coverage in this band.

Shooting at night

[På svenska här]

I have gotten a few questions on how to set the camera up for good night shots and there is really nothing to it this is what I normally do is very simple things. If you check your camera manual you should be able to follow the same settings.

Here is an example of a night shot that I have taken with my old Nikon D70s:

Night Traffic
Nikon D70s, Taken from the roof top of the old tax building in the south end of stockholm using a tripod and long exposure. 30 second exposure and f/20.

Fortsätt läsa Shooting at night

Camera Settings: Street Photography

People sometimes ask in forums and other places what is the optimum settings for certain types of photography. Although there is no absolutely clear answer—it depends what you are trying to capture of course and your own style there are some things that are useful to remember.

  • Continuous shooting (Ch or continuous high)
  • Tracking autofocus
  • Aperture priority
  • ISO200
  • Center focus
  • Matrix metering
  • White balance daylight/cloudy
  • RAW format

Here are my arguments for each of these settings.

Continuous shooting this is great because if something happens unexpectedly you just point and keep shooting frame after frame and you might get that special picture even if you was not ready to compose and wait for the moment. Things happens fast in the street so be prepared. A useful lens to have mounted is a superzoom, 18-200 mm or similar, they give you great range and can handle almost any urban situation. The drawback is of course that superzooms are a compromise and may lack sharpness for example.

Tracking autofocus this means the camera keeps focussing all the time even if you keep shooting frame after frame. This is good for tracking moving objects but you have to be aware where the focus points are in your frame. On Nikon cameras this is AF-C (Autofocus continuous). Single time focusing is called AF-S.

Aperture priority or the ”A” mode on the camera. This allows you to select the aperture for best depth of field and focus and the camera will automatically pick the apropriate shutter time for a good exposure. This means you don’t have to worry about the exposure and you still maintain a high level of control. Most lenses are sharpest when they are stopped down 2-3 steps. For most this means that f/5.6 – f/11 is probably the best choice in broad daylight. As your light diminish, keep shooting but open the aperture to f/3.5 or f/2.8 or even further if your lens supports it! Most superzooms can not open byond 3.5 at their broad end and 5.6 at their far end.

ISO200 this is a good setting because it minimises the noise from the sensor. If the light conditions are low, raise it but do it with caution since it can produce severely grainy images. Some cameras are much better than others though, you may want to experiment with this. But if your light conditions do not require it—keep your ISO low.

Center focus is preferred because thats where you aim. Use the AF-L (autofocus lock) button to lock if you wish to recompose. The reason center focus is so nice is that if something happens quickly you tract it the focus system has a better chance of concentrating on the object you are tracking. On Nikon cameras the 21 point focus system is great. On the older models as the D70 that has a very limited number of focus points use the single center dot.

Matrix metering means the camera is ready for most light conditions. Activate the ”highlight” function on your display to see if the metering has overexposed the picture, then use the exposure compensation setting +/- to change, recompose and take another shot. Using spot metering it may be very difficult to get the right exposure when there are multiple light sources as it generally is in the city. Centre weighted can sometimes be useful but most of the time matric metering is the best.

White balance does not matter too much if you are shooting RAW which you should be anyway… you can always correct this afterwards in your post processing because RAW files keep the sensor data as it was while JPEG will apply the white balance to the final picture. If you are shooting JPEG then set your WB accordinly, if you are shooting RAW you may do so but auto is usually fine as well.

RAW format is great because it allows you to adjust exposure and white balance with the maximum dynamics in the picture. In RAW you can easily correct 1 EV underexposure but if you attempt to do this on a JPEG the picture usually does not fare well.

JPEG format is not listed above but still very useful in certain situations… There is one time I will flip to JPEG when shooting street phot and that is when I will be taking long series of pictures of some event such as marathon runners or similar. The reason is that when I shoot RAW my camera buffer overloads after a few pictures and the camera can not fire as rapidly as in the beginning because it has to wait for the memory card to ”swallow” all the data. Since JPEG images are pre-compressed before they are written to the memory card they are smaller and thus allows me to shoot very long series of pictures before the camera memory buffer is full and it starts to ”stutter”. Don’t forget to set it back to RAW when you are done!

A Guide to Infrared Photography

This article will start by assuming that you are very familiar with your camera and how to use it in manual mode. You need to understand apertures, shutter times, how to use the cameras histogram to understand over- and under exposure.

If you are not familiar with these topics, then it would be better if you familiarized yourself with them before. There are a number of articles you can find that will take you through this of course.

What is infrared light?

Infrared light is light that has a frequency that is lower than the visible light in the spectrum. We can also say that the wavelength is longer than the visible light. Infrared light have various properties that are different from visible light and it reflects and refracts different from visible light through the camera lens.

Here is a diagram that shows how the infrared spectrum relates to the visible light spectrum. In this article we will only be talking about photographing in the infrared spectrum that is close to visible light, between 1200-730 nm roughly. Infrared photography in this aspect is not to be confused with heat signature cameras and systems such as FLIR (example below) which are used for example to detect body heat. There is also the ”far infrared spectrum” said to have medicinal use and influence for example the production of vitamin D in the skin of humans and a few other species.

Radation in the thermal heat range and the far IR range does not really affect the result of IR photography as we have limited our reception range to the near visible light IR spectrum. The sensors in a digital camera is also not very sensitive in ranges under 1000 nm so it makes little sense trying.

This shows the spectrum of electromagnetic radiation. Source: Wikipedia Commons.

Looking at the picture above we can see that the visible light spectrum ranges from around 730 nm to about 370 nm. Above we have X-ray and gamma rays, nasty stuff to us humans but below is the infrared portion of the band.

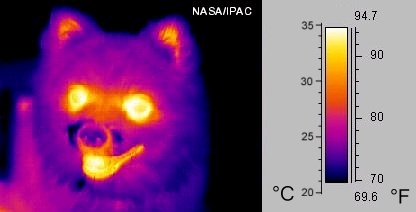
Thermal Image of a Dog. Source: Wikipedia Commons.

Here to the left is a picture taken with a different technology (FLIR) that captures the heat radiated from a body.

We can here see the lighter areas correspond to hotter parts of the animal. This is a technique that is quite often used for tecnhical purposes such as trying to find leaks in insulations and heat pipes and similar.

This is known as thermal imaging but is the area around 100 µm and photographic sensors for normal cameras don’t work well in this range. This is however what most people think about first when subjected to the term ”infrared photography” and it is important to distinguish between the two.

So the infrared spectrum we are interested in lies between the lowest portion of the visible light spectrum around 730 nm and down to perhaps something like 1200 nm. This light comes normally from very ”hot” sources, such as the sun, or a light bulb perhaps.

Those of you who are physiscists may remember the black body radiation formula and put it to use here :)

Black and White
In this picture it is possible to see the difference between the visible light spectrum and the IR spectrum. The left hand picture is shot with infrared filter and the right hand side is a normal visible light picture that has been shot in B&W

Fortsätt läsa A Guide to Infrared Photography

Flickr Scripts

Here are some of my favourite GreaseMonkey scripts for Flickr that I use almost daily:

Flickr Refer Comment
This script allows you to put a small signature when commenting pictures that tells the people where you found the picture. It is a very nice feature and tells people where you are finding their pictures when you comment them – which group, if you are reading through RSS aggregator, in your friends and family collections and so on.
Flickr Buddy Icon Reply
This script allows you to reply with a buddy icon and / or name so that people know who you are responding to when making a follow up comment. Lovely script!
Flickr – Multi Group Sender
This script allows you to pick from a list all the groups you wish to send a photo to. Normally you have to pick one group at a time and from the organiser you can only send a nuber of photos to one group at a time but with this you can send one photo to several groups at the same time.

In order to use any of them you must first install Greasmonkey, a scripting add-on for Firefox that also can be gotten to work with Internet Explorer.