Etikettarkiv: camera

Getting your SB-800 speedlight to work again

I recently brought out my trusty SB-800 speedlight but could not get it to work. To be honest it has been sitting in my camera bag for a while unfortunately so with the batteries in, a definitive no-no when it comes to camera gear – always remove batteries when you put the stuff away for more than a day or two.

So I replaced the old dead batteries and found one connector that had corroded a little. Not good, but with some rubbing alcohol and patience it cleaned up nicely and I got a good electrical connection. Unfortunately that did not help much the flash refused to start anyway.

So I started looking around, not noticing anything in particular and I was prepared to ask Nikon for an RMA when I did a quick google on the problem. Turns out that several people have had problems with SB-800 and SB-600 when they have been sitting collecting dust for a while and then they don’t want to start up.

The solution was simple. Hold down the power on button while twisting the top back and forth as well as shaking the whole thing. I could not believe it, it started right up and now it is working fine.

I have no idea what was going on there but the twisting-shaking motion definitely brought it back to life.

Google is documenting Swedish ski slopes

Google snowmobile, Photo: Pontus Johansson

Google Sweden has a specially designed snowmobile that they are using with the google camera technology to creat a first person view of all the ski slopes in Sweden. The snowmobile has been spotted in several different ski slopes, large and small, documenting the whole slope.

You can expect an integration in ”StreetView” with the swedish ski slopes soon. Something that I believe ski enthusiasts will be happy for. You can virtually visit the ski slopes before you pack your bags and go there in person. Very handy…

Nikon F mount celebrates 50 years

Yes, indeed, the longest lasting 35 mm camera system lens mount is now celebrating 50 years of existance. And 50 years of remarkable compatibility I must say, of all the well known brands for small frame cameras the Nikon F mount is the longest lasting and surviving mount that is still around.

There are many advantages to this of course, any lens made since 1956 or so can be used on modern cameras wich means the used lens market is huge. You might not get metering or autofocus but if you are prepared to do some of these things in manual mode then this is for you.

Canon changed their mount with the introduction of the digital cameras to their EF mount. There are even two types of EF mounts, one for the small APS-C sized digital cameras and one for their ”full frame” counterpart, the reason being that because of the tightness between the lens aft parts and the mirror some lenses designed for the 1,5 crop format would actually touch the mirror when it flips up if mounted on full frame cameras.

I have used older lenses with mechanical autofocus on my Nikon D70s and D300 cameras and both makes great use of them. I have even tested fully manual lenses and they work pretty well if you take the time to focus properly or use a sufficient large DOF of course :-)

The drawback is that the standard F-mount puts the lens a bit further from the focal plane than Canon and some other makers does, this means that it is not possible to use say Canon lenses on Nikon bodies while the reverse can be done with some success.

So happy birthday F-mount!

Nikon D300

So finally I have upgraded to a new camera. After using my D70s for several years I had a careful look-around at what was out there and I decided on the D300. I have met many photographers, both beginners and professionals who have used the D300 in the last year and all of them seemed very happy with their investment, although some said they’d waited for the D700 FX sensor camera instead if they had known it was about to be released.

I decided against the D700 for several reasons and the most important one was the lenses. DX lenses won’t be able to work very well on the FX sensor in the D700 and I like the DX lenses for two reasons, they are sometimes half the price of the comparable FX lenses and they are lighter to carry. The last point is important because I love to hike and bring the camera gear with me. 

The D300 is also a fair bit lower priced than the D700 which meant I got a nice kit including three lenses and an SB-800 for just a little more than what the D700 house would have cost me so I am really happy with it. 

The main reasons for my upgrade was the following

  • The small display on the D70s makes macro work difficult
  • There is no mirror lock-up function meaning mirror slap shakes when using long exposures and tripod.
  • The noise at higher ISO on the D70s is shameful compared to the modern cameras, in reality anything above ISO 600 is unuseable.
  • D-Lighting exposure control in the D300 and newer cameras is fantastic in some difficult light conditions.
  • 14 bit RAW format (12 in the old cameras) meaning 12 dB better image dynamics per colour!
  • No vertical grip for the D70s (that is seriously useful), the MB-10 battery grip for the D300 is awesome!
  • Faster serial shots, lovely when shooting animals like birds. 8 frames per second on the D300 is a vast improvement from the D70s.
  • Larger buffer memory also helps with serial shots.
  • Easier controls on the camera – even if the D70s had nice controls the D300 is not only nice, they are seriously well laid out and though through.
  • Faster in every aspect.
  • Has PC sync connector on camera
I will still keep my D70s of course and likely it will become a pure Infrared camera, converted to take only IR pictures in the future.

Here are some test shots, these are taken handheld in the middle of the night just using existing light. Yes there is noise, but not much and the pictures are actually quite nice. The D70s would come nowhere near this and would not even reach ISO 3200.

Allén

Misty street lights

SLR Gear

This site is incredible. Really incredible. If you want to know how your lens is doing technically you must visit this site and check it out. Find out which aperture setting produce the sharpest images for each of your focal lengths.

SLR Gear >>>

Learning to read the diagrams here is a bit tricky but there is a wealth of information on almost any lens you can think of getting for your camera and also other stuff. But I really love it for their lens reviews.

Camera Settings: Street Photography

People sometimes ask in forums and other places what is the optimum settings for certain types of photography. Although there is no absolutely clear answer—it depends what you are trying to capture of course and your own style there are some things that are useful to remember.

  • Continuous shooting (Ch or continuous high)
  • Tracking autofocus
  • Aperture priority
  • ISO200
  • Center focus
  • Matrix metering
  • White balance daylight/cloudy
  • RAW format

Here are my arguments for each of these settings.

Continuous shooting this is great because if something happens unexpectedly you just point and keep shooting frame after frame and you might get that special picture even if you was not ready to compose and wait for the moment. Things happens fast in the street so be prepared. A useful lens to have mounted is a superzoom, 18-200 mm or similar, they give you great range and can handle almost any urban situation. The drawback is of course that superzooms are a compromise and may lack sharpness for example.

Tracking autofocus this means the camera keeps focussing all the time even if you keep shooting frame after frame. This is good for tracking moving objects but you have to be aware where the focus points are in your frame. On Nikon cameras this is AF-C (Autofocus continuous). Single time focusing is called AF-S.

Aperture priority or the ”A” mode on the camera. This allows you to select the aperture for best depth of field and focus and the camera will automatically pick the apropriate shutter time for a good exposure. This means you don’t have to worry about the exposure and you still maintain a high level of control. Most lenses are sharpest when they are stopped down 2-3 steps. For most this means that f/5.6 – f/11 is probably the best choice in broad daylight. As your light diminish, keep shooting but open the aperture to f/3.5 or f/2.8 or even further if your lens supports it! Most superzooms can not open byond 3.5 at their broad end and 5.6 at their far end.

ISO200 this is a good setting because it minimises the noise from the sensor. If the light conditions are low, raise it but do it with caution since it can produce severely grainy images. Some cameras are much better than others though, you may want to experiment with this. But if your light conditions do not require it—keep your ISO low.

Center focus is preferred because thats where you aim. Use the AF-L (autofocus lock) button to lock if you wish to recompose. The reason center focus is so nice is that if something happens quickly you tract it the focus system has a better chance of concentrating on the object you are tracking. On Nikon cameras the 21 point focus system is great. On the older models as the D70 that has a very limited number of focus points use the single center dot.

Matrix metering means the camera is ready for most light conditions. Activate the ”highlight” function on your display to see if the metering has overexposed the picture, then use the exposure compensation setting +/- to change, recompose and take another shot. Using spot metering it may be very difficult to get the right exposure when there are multiple light sources as it generally is in the city. Centre weighted can sometimes be useful but most of the time matric metering is the best.

White balance does not matter too much if you are shooting RAW which you should be anyway… you can always correct this afterwards in your post processing because RAW files keep the sensor data as it was while JPEG will apply the white balance to the final picture. If you are shooting JPEG then set your WB accordinly, if you are shooting RAW you may do so but auto is usually fine as well.

RAW format is great because it allows you to adjust exposure and white balance with the maximum dynamics in the picture. In RAW you can easily correct 1 EV underexposure but if you attempt to do this on a JPEG the picture usually does not fare well.

JPEG format is not listed above but still very useful in certain situations… There is one time I will flip to JPEG when shooting street phot and that is when I will be taking long series of pictures of some event such as marathon runners or similar. The reason is that when I shoot RAW my camera buffer overloads after a few pictures and the camera can not fire as rapidly as in the beginning because it has to wait for the memory card to ”swallow” all the data. Since JPEG images are pre-compressed before they are written to the memory card they are smaller and thus allows me to shoot very long series of pictures before the camera memory buffer is full and it starts to ”stutter”. Don’t forget to set it back to RAW when you are done!

A Guide to Infrared Photography

This article will start by assuming that you are very familiar with your camera and how to use it in manual mode. You need to understand apertures, shutter times, how to use the cameras histogram to understand over- and under exposure.

If you are not familiar with these topics, then it would be better if you familiarized yourself with them before. There are a number of articles you can find that will take you through this of course.

What is infrared light?

Infrared light is light that has a frequency that is lower than the visible light in the spectrum. We can also say that the wavelength is longer than the visible light. Infrared light have various properties that are different from visible light and it reflects and refracts different from visible light through the camera lens.

Here is a diagram that shows how the infrared spectrum relates to the visible light spectrum. In this article we will only be talking about photographing in the infrared spectrum that is close to visible light, between 1200-730 nm roughly. Infrared photography in this aspect is not to be confused with heat signature cameras and systems such as FLIR (example below) which are used for example to detect body heat. There is also the ”far infrared spectrum” said to have medicinal use and influence for example the production of vitamin D in the skin of humans and a few other species.

Radation in the thermal heat range and the far IR range does not really affect the result of IR photography as we have limited our reception range to the near visible light IR spectrum. The sensors in a digital camera is also not very sensitive in ranges under 1000 nm so it makes little sense trying.

This shows the spectrum of electromagnetic radiation. Source: Wikipedia Commons.

Looking at the picture above we can see that the visible light spectrum ranges from around 730 nm to about 370 nm. Above we have X-ray and gamma rays, nasty stuff to us humans but below is the infrared portion of the band.

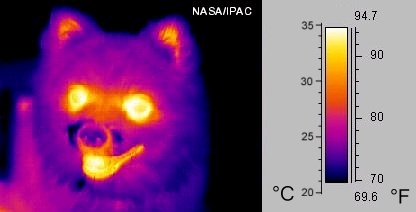
Thermal Image of a Dog. Source: Wikipedia Commons.

Here to the left is a picture taken with a different technology (FLIR) that captures the heat radiated from a body.

We can here see the lighter areas correspond to hotter parts of the animal. This is a technique that is quite often used for tecnhical purposes such as trying to find leaks in insulations and heat pipes and similar.

This is known as thermal imaging but is the area around 100 µm and photographic sensors for normal cameras don’t work well in this range. This is however what most people think about first when subjected to the term ”infrared photography” and it is important to distinguish between the two.

So the infrared spectrum we are interested in lies between the lowest portion of the visible light spectrum around 730 nm and down to perhaps something like 1200 nm. This light comes normally from very ”hot” sources, such as the sun, or a light bulb perhaps.

Those of you who are physiscists may remember the black body radiation formula and put it to use here :)

Black and White
In this picture it is possible to see the difference between the visible light spectrum and the IR spectrum. The left hand picture is shot with infrared filter and the right hand side is a normal visible light picture that has been shot in B&W

Fortsätt läsa A Guide to Infrared Photography

AE-L/AF-L button has 2 hidden functions

Nikon cameras (and most certainly others as well) has a button on the back side of the camera called AE-L / AF-L. The normal function of this button is to lock exposure and auto-focus so that you may recompose the shot and then press the shutter release without the camera attempting a new focus or metering and changing the exposure parameters.

This article will start off on the D70s camera that I have, but should work very similar on most Nikon digital bodies. It may also be the same for Canon and other brands although I have not verified it. If you know, please leave a comment to this effect!

Most people are probably aware that in the camera CSM menu item #15 you can control what this button actually does. The obvious choices here are the following:

  • Lock exposure and auto-focus at the same time (AF/AE mode)
  • Lock only auto-focus (AF mode)
  • Lock only exposure (AE mode)

What people generally do not know is that there are two more modes that are very useful in certain situations. These modes are:

  • Auto focus ON mode (AF-ON mode)
  • Flash metering off mode (FV mode)

They are not so well described in the manual and so you may want to practice a bit with using them! The rest of this article is to describe some situations where they are quite useful:
Fortsätt läsa AE-L/AF-L button has 2 hidden functions